This portion of the guide assumes you have already signed up with callcentric.com and have an account number and incoming phone number. If not, do it now.
As you can see from the 3 images below, it’s pretty straight-forward…
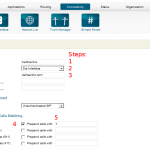
Add a Trunk: First Image
- Click Connectivity
- Click Trunk Manager
- Click Add Trunk
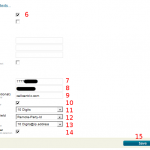
Trunk Settings: Second & Third Images
- Give the Trunk a meaningful name. Callcentric is good.
- Keep the SIP Interface setting
- Put callcentric.com as the server
- Assuming you’re in the USA, click the checkbox next to 10-digit US
- Again, assuming USA, put a 1 in the field after the checkbox you checked.
- Check In-House Only
- Find the 1777 account number you got from callcentric. Put it in the SIP Username field.
- When you signed up for callcentric, you set a password. If you didn’t change the SIP password after that (which you can do and I would recommend doing it) then enter the password you created when signing up for callcentric. If you changed it, put in the new SIP password.
- Enter callcentric.com for the SIP from domain field.
- Check Register
- Keep the 10-digit Caller-ID format
- Keep Remote Party ID as the Outbound Caller ID
- Keep 10-digits@ip address as the SIP Invite format
- Check the checkbox for Inbound DID in To-User
- Click Save
Viola! You should see that the “Phone has now registered” on your callcentric.com dashboard page underneath where it gives you account balance.
Next we will go into setting up your number, devices, and auto attendants.