So this step basically enables you to make calls out from your Blue.Box VIOP System. It’s quite easy and you will be up and talking in no time.
As before, I have some numbered screen-shots for you below.
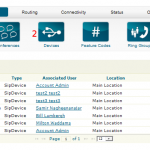
Adding a Device: Image 1
- Click Applications
- Click Devices
- Click Add a Device
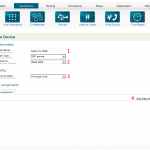
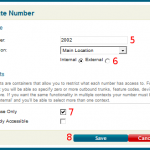
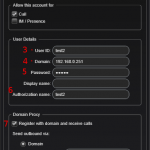
Device Settings: Images 2, 3, & 4
- Give the device a name. Extension for 2002 is good as it’s informative, assuming you’re going to give it the number 2002, which I am.
- Assign the device to whatever user it is for. If you haven’t created any users yet, just use the default selected for now.
- Set the Context to In-House Only.
- Click Add A Number
- Enter a Number, 2002 in my case.
- For Type make sure Internal is selected.
- Make sure In-House Only is Checked and Publicly Accessible is Unchecked.
- Click Save.
- Set the Internal Caller Name to whatever you want. This is what will show up on other extensions caller id when this device is used.
- Set the Internal Caller Number to the number you’re going to give this device, in my case 2002.
- Set the External Caller Name to whatever you want on the Caller ID when this device calls a land line.
- Set the External Caller Number to the number you want showing on the Caller ID when this device calls a land line.
- Set the SIP Username to what you want, remembering it so you can setup the device properly.
- Set the SIP Password to what you want, remembering it so you can setup the device properly.
- Click Save.
Install the Software on your Computer
- Download XLite 4 from http://www.counterpath.com/x-lite.html
- Install the downloaded file.
- Run the Program
Configuring XLite 4: Images 5 & 6
- Click Softphone and then click Account Settings
- In Account Name put in whatever you want. I used my username.
- In User ID put in the Username from step 8 above.
- In Domain, put in the IP address of your VOIP computer. If you don’t remember it, look back to the final step of installing Blue.Box from the first guide.
- In Password, put in the Password from step 9 above.
- In Authorization Name, just put in the usename again. This may not be necessary.
- Make sure Register with Domain is checked.
- Click Ok
You should now be able to call out to any regular land line from your computer. Enjoy!